Wednesday, November 30, 2011

Embroidery Journal Project

Hi all,
Maybe you have heard of the Bead Journal Project or the Quilt Journal project, there is apparently also a crazy quilt journal project. For some time now, I have been a bit jealous of them and their projects. But not any longer. I'm officially starting the embroidery journal project. It's a bit informal to start with, as I don't know if it will just be me or others will be interested. And to start with, I'm running it from here. Perhaps if there are others who are serious about joining in, I will make formal lists of participants. I've made a page here on this blog for the 2012 embroidery journal project. Anyone is welcome to join in, even if you join in late.
I made this project because these little black birds that live around here have an incredibly beautiful song, but you can only hear it in the spring and up to the middle of  summer, then they are quiet. Attracting a mate is but one reason they sing.  The little bird sitting on the branch was planned, the rest just came out as I went.
I've already experimented a bit with this whole idea myself this year. The projects I am putting in this post to break up the texts a bit are my practices, if you will. There was some particular thought behind each of these that I stitched. The projects are all 4 x 4 inches. This is a size that I feel gave me plenty of room to create without being overly large.
This is actually one of my store patterns, but it's me also experimenting with using a lot of colors in this style of design. The rainbow type project coloring can be a bit of challenge to get it to work right.

So what is this about really? I believe there is something inside us that motivates us to choose certain themes and projects over others. We only have so much time after all. What is it that is trying to get out and what are we hoping to say?

I believe embroidery is an art form. We can use it to express ourselves, perhaps even learn to understand ourselves better. When you silence the inner critic and let the stitches flow, you let your right brain have its way, and amazing things can come out. Things you just can't put into words.
A fall project, of course. We have some maples on the property, they are beautiful trees. I wanted to use my summer stitch school stitches in a project, and experiment with texture. It's fun to do this type of embroidery. Of course, the leaf shape was drawn on the fabric, the stitches just came from there.

Everyone has a story, everyone has different experiences. Use your embroidery to tell those stories. Let others learn from you. Each of us has our own way of making stitches on a fabric, even the same exact stitch is different from person to person. Let those be part of your story.

There are really no technical requirements, just a willingness to try and share. The project can be anything, if you insist on following a pattern you of course, can, but it really is better to just pick up your fabric and make your own themes and motives. If you feel that is beyond you, then take a pattern you really like and make some effort to change or personalize it, so it's the way you want it to be.

The project can be any style, it can be very definite forms and shapes or it can be free and abstract. Neither is wrong. But do take the chance to go out of your comfort zone just a little, try some new technique or new stitches. There are many ways to tell your story, perhaps a new method will open new opportunities for you.
This was my first completely unplanned project. I started with letters. I knew I wanted a spring theme. Something to capture the exploding new life around me.

Just one more thing to say: that is this is part of my effort to help make stitching more personal, because this is what it is about. It isn't about making perfect stitches and perfect designs. There is enough press in the world for us to all be "perfect". In addition, our personalities are getting lost in the mass manufactured culture out there. Use your crafting skills to be unique.

Monday, November 28, 2011

Nutcracker Ornaments

I finished up the last in the series of Nutcracker ornaments this weekend. It seemed easier to do the ornament-making steps all at once when I had the materials and tools out. So here they are!
Clara
The Toymaker
And the nutcracker himself

The whole set in a photo together!

I have to say these were surprisingly fun to do. There was no expectation of super fine stitching like the stumpwork is sometimes. I actually managed to do a variety of stitches too. There is plenty of sparkly metallic threads, just as Christmas ornaments ought to be!


Tuesday, November 22, 2011

Flat Ornament Tutorial

Hi, all. I am working through the set of Nutcracker ornaments, and I thought it might be a good chance to write up how I make them. This kind of ornament makes a nice finish perfect for hanging on the tree or around the home. I'm putting a "glue warning" on this project for those of us that sometimes have trouble with getting it all over-;) Keep an extra piece of paper handy to wipe off glue and try as hard as you can NOT to get it on your embroidery. :)

First my pile of materials. (Not shown is some kind of  trim for the edges.)
I cut my fabrics about 1 inch bigger than the intended size. (I add about a quarter of inch around the embroidery.) I have two rectangles that I cut from mat boards, the kind used to frame pictures. Also, I use white craft glue, a piece of quilt batting, masking tap, and an exacto knife and clear ruler to cut the mat board.

I first glue the quilt batting to one of the cardboards. This will be for the front. Let it dry all the way, or you risk the glue seeping out to your embroidery, and that's not so nice.

Next I use the tape to attach the fabrics to the mat board. This isn't the fanciest of ways, but it works well. It can be annoying lining the design up nicely, but it's worth the time to make sure it is. I tape down the corners, then the sides.  Pull firmly on the fabric, so isn't loose on the front side. If you are a perfectionist you can make perfect mitered corners. It will make the corners less bulky if you do that, but the trim can hide some of the imperfections in the corners.


I do the same for the embroidered piece, using a bit more tape to hold it down evenly. Note, make sure the tape doesn't get too close to the edge or it will be hard to glue the pieces together in the next step.

Next is to glue the two pieces together. Spread a layer of glue around the back side of your covered mat boards. Make sure it goes to the edges and corners, but preferably not over, especially if you plan to sew your trim in place. I put the two pieces together, then put the ornament down on a flat surface face up. I cover the embroidered surface with a folded towel, and put on some heavy books. Then let this sit until it's all dry. 

Now it's time to attach the trim. You can choose to glue it on or sew it on. You can use pretty much any kind of trim, yarn, ribbon, or beads that you want. In this example, I couch down some soft cotton yarn. I like to leave my stitches a bit uneven.
I tuck the ends of the yarns a bit in between the two pieces to keep them out of the way.

I like to use beaded hangers for my ornaments. I usually use 2 strands of cotton floss and attach it firmly will several small stitches, then add the beads, and make several small stitches again before cutting the extra floss. And that is pretty much it!  It isn't hard or time consuming. :)

Friday, November 18, 2011

Fall Stitch School: Crewel Embroidery Seed stitches

Welcome to another lesson from Fall Stitch School with The Floss Box. This week I'm going to look at seeding stitches. And I don't mean "seed stitches", well I do, but I mean more generally stitches that can be sprinkled about in a regular or irregular pattern in crewel embroidery. These are filling stitches that don't completely fill an area. These types of stitches add a lot of interested to your stitching without requiring as much time as covering the area completely with long and short stitches or satin stitching. Plus it is a nice variety with areas that let a bit of the background fabric show through.

What types of stitches can be seeded then? Basically any stitch that can form discrete units. Detached chain or french knots are classic examples in crewel embroidery. Seed stitches are another. By definition these are small straight stitches sprinkled about randomly. But straight stitches can be placed in more regular patterns too.
The photo shows various stitches that could be used in crewel embroidery.

My Swedish reproduction wool embroidery project has examples of using scattered french knots - in this case they follow regular patterns.
You can see they add quite a bit of interest even without shading in a hole area.

Let your imagination guide you! These sorts of stitches are not limited to just the crewel world!

The Mouse King Ornament

I managed to stitch 1 of 5 Nutcracker ornaments. I am hoping to do all them. This one went pretty quickly for me.
I started with The Mouse King because he is the meanest of the lot and maybe that makes him the most fun! ;) I've already started the next one in the series.

These are store patterns and they are fun and make great ornaments! You'll find them in The Floss Box Embroidery Store.

Wednesday, November 16, 2011

Finished Squirrel Project!

Yesterday I put in the final stitches!
I took a few closeups too you can enjoy. I'm pretty happy with this project. It was a good challenge for me.

The squirrel was a bit tricky to stitch in place, but I made it work. The tail is made out of turkey knots that I trimmed and brushed out. That's a fun step by the way. It's fun to snip away the uneven strands and see things even out.


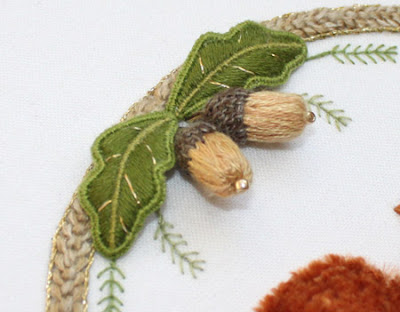
The acorns and leaves were easily set in place.

The berries were too. The needlelace leaves were a bit tricky since I had to push the wires through some thick stitches, but in the end it's all as it should be.

The mushrooms perhaps aren't so exciting, but I really didn't want them to draw much attention from the rest of the piece.

I am not sure what's next, probably a bit of Christmas stitching. You've got to start early!!

Monday, November 14, 2011

Little Pieces

One of the fun things about stumpwork is all the little pieces you make and attach. They are a lot of work sometimes and sometimes are a bit fussy to work with, and above all demand patience. But the result is quite often worth the trouble which is why I do this type of needle work.

First the beetle.
I haven't been so big on insects in my embroidery, but they are growing on me. So many possibilities with them.
This beetle has 3 layers of felt for the body. I do satin stitch over, then I added some metallic thread. It's so nice and sparkly. I will add wired antennae at the end.

The leaves - I have done two styles of leaves. The larger oak leaves will be at the top, and the little ones on the side somewhere. Mr. squirrel joined the photo too.

Next I have two acorns and some "berries"
These are all made with strips of rolled felt, then covered with either threads or beads. As you see the berries are rather large next to the acorns. They ended up a bit larger than intended, so I may or may not put them on the piece. I have to see how it looks together.

And finally some thread-covered wooden beads.
I actually  made these for another project, but I didn't think they really fit it very well. You can use any type of wooden bead for covering with thread. The trick is to get a file in the middle and make the hole larger so the thread will fit in there. The larger the bead, the bigger the hole will need to be.

Those are my little pieces! Next time you will see them all in their place on the fabric. :)