This week I have been working on my embroidery journal project, and I thought I would take the chance to show a useful embroidery technique. Making slips has been around for centuries. It was a convenient way to make an embroidery that could be moved from one object to another when the background fabric got old, thus preserving the work. So what are they and how do you make them?
Embroidery slips are bits of embroidery that are sewn on one fabric then appliqued to another. They can be fully stitched in or partially. They can be stuffed in order to give dimension to your embroidery. They are widely used throughout stumpwork, raised embroidery, for this reason.
So the first thing you need is a design! I have made these slips many times now, and I recommend always enlarging the area to be attached by about 7% - this number will be higher for small objects. How can you tell how much that is? I made a little graphic of my before and after to demonstrate this. In this example it's maybe 1/16 inch.
This is something to consider to when planning your slips: It is really difficult to make nice little points. So in this example. I don't include the beak. It's easy to stitch those little details on at the end.
Next, you really should embroider as much of the background fabric as you can before attaching your slip because it will be in the way and might get worn or dirty. So that is what I have done:
A note about marking the fabric with the slip is to be attached. I have had troubles in the past with the slip not being the size I intended, so I really recommend that you mark it very lightly or with washable ink because it is very difficult to get the slip to sit exactly over the lines. It's a little hard to see, but I marked the beak, the top of the head, the lower belly, and a little on the back. The tail feathers are also a reference point too in this example.
Next mark and stitch your slip on another piece of fabric. Then cut it out leaving about a quarter inch seam allowance. You will need to trim curves and points a little which I haven't shown in the photo.
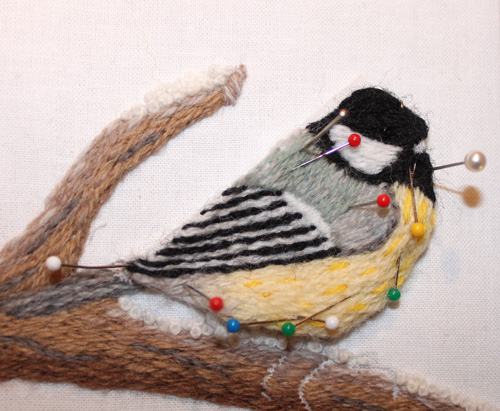
Then turn under the seam allowance. You can use pins to hold them down. I always pin the slip to the fabric by just poking the pins straight down. They will be in the way, so you have to work around them, but it is simply to bulky to pin them properly. At the very start you need to go slowly and be sure the slips stays where you want it to be as you make your small stab stitches.
If you plan to stuff it, start in a place that is easy to leave a little opening. I chose the back of the bird. I have used floss, but I think sewing thread is best for attaching the slip. This time I used hand quilting thread. It's extra strong. Continue around the shape making little stab stitches.
When you have a little open space for stuffing anchor your thread to the back of the fabric so it doesn't pull loose while stuffing. I have done these with very small gaps, but this one allowed me a little extra space, so my gap is maybe 3/4 inch. You will need something sharp but blunt at the end to push in the stuffing. I sometimes used tweezers I hold shut. It can even work holding your embroidery scissors closed, just don't push to the edge.
Stuff your shape lightly. It nearly always bulges a little on the back, so don't make it stuffed like a pillow. Then close your opening with more stab stitches.
The next step is optional, but it separates the pros from the amateurs. It takes a little extra time, but it improves the appearance substantially. You will need to go around the edge of your shape and make little straight stitches with matching embroidery thread to cover where the fabric and the slip meet.
Go around the whole shape like this. For this example, I also extended the stem stitching on the wings by 1 stitch to cover the gap.
You can seen above that I have covered all around the edge. I also added a few straight stitches for the beak, coming up through the slip and down in the back ground fabric. If you do it the other way, you will squish your slip down.
And now you are done!!
My little bird really stands out from the fabric. More and better photos are coming when I am finished with the project.
Final notes. This technique is not hard, but it does take a little extra time and patience and some practice. It really does look great in the end, so I highly recommend it as a way to make your embroideries more interesting.


10 comments:
Fantastic! Thank you for sharing :)
That's so beautiful. :-)
Great tutorial, Emily! I've submitted it to Craft Gossip, so hopefully lots of people will see it. If you're on Stitchin' Fingers, do add it to the tutorials page!
Thanks for your tutorial. Your bird is lovely, and I appreciate the extra tips for spiffing it up.
What a lovely little bird. And a great, easy to follow tutorial. Thanks.
A fabulous tutorial, thank you!
Thank you for the tutorial. I hope to try this soon.
Thanks too to Elizabeth for the heads up.
Thanks for the tutorial.
Great tutorial! I never knew about slips. I will give this a try :)
The bird is beautiful...
Chandice
Hi!
Great tutorial.
Why do you make the motif a little bigger, apart from allowing some 'space' to stuff it?
Post a Comment